What are observations?
What is the OMG?
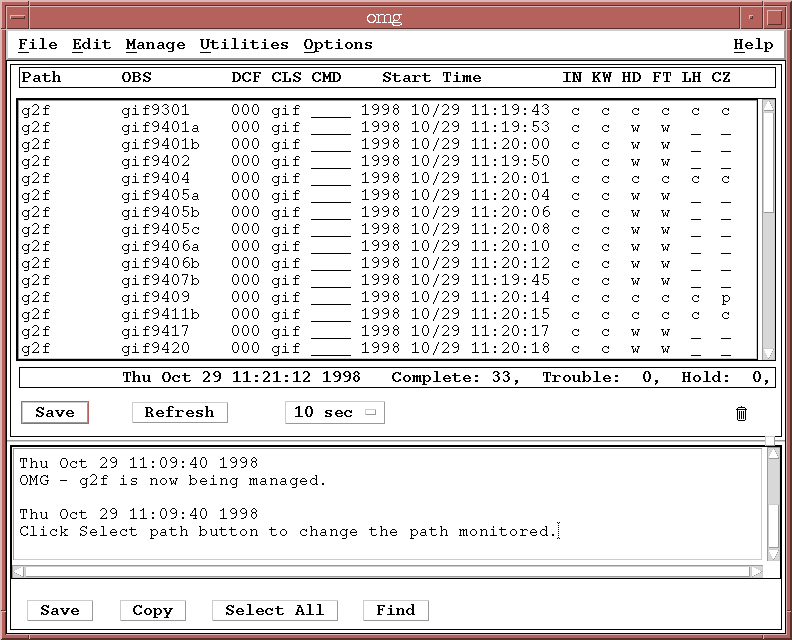
Do I need anything special to run the OMG?
How do I start the Observation Manager?
omg &
However, with the introduction of the OAPI the OMG reports false error messages to the screen. If you would prefer not to see these messages, redirect both standard output and standard error to /dev/null when running the OMG. This is done in the CSH like:
omg >& /dev/null &
If you want the title bar of the OMG window to say anything special, you
can include that with a "-title" switch (a Motif standard). For example:
omg -title "Ralph's pipeline monitor" >& /dev/null &
Note: The "-n" switch recommended in previous versions of the FAQ can cause the OMG to crash.
Has the OMG's performance degraded in the 2.2 release?
Does the OMG support the OAPI?
What is the difference between managing and monitoring a path?
By default, the OMG begins managing the path indicated by the resource item
*PathDialog*PathSelected.items: g2fin the omg.dat located in your login directory. If you would prefer that the OMG start up in monitor mode instead of manage mode, then change the resource item
*PathDialog*ManageButton.set: 1to
*PathDialog*ManageButton.set: 0You can also toggle the mode (manage or monitor) while the OMG is running by choosing "Select Path..." from the OMG's "File" menu, then checking or unchecking the "Manage" button and clicking "OK".
You can also override on the command line using the standard method of overriding an X-resource,
%omg -xrm "*PathDialog*ManageButton.set : 1"
What is an Observation Status File (OSF)?
The OMG uses OSFs to control and manipulate observations which are being processed by the OPUS pipeline.
The OSF is parsed by the OMG. The OMG then interprets the parsed filename to determine what information is to be displayed. The OMG allows the user to modify certain fields of the OSF to control how an observation processes through the pipeline.
The following information is contained in this OSF:
   34070859-CCCCCC__________________.gif9703___________________
   |-- 1 -| |--------- 2 ----------| |----------------------
   ______________________________________-GIF-000-____
   --------- 3 -------------------------| |4| |5| | 6|
- TIME STAMP: The first component of the OSF is a time stamp expressed as a hexadecimal number (34070859). This is the time at which the observation first started in the pipeline. It is translated into a user-friendly ASCII time and displayed in the "Start Time" field of the OMG display. You can use the time_stamp utility to make the same translation.
- STATUS: These letters indicate the status of the observation (CCCCCC, i.e., the first six steps in the pipeline are "Complete"). Typically, one column is used for one process in the pipeline, although multiple processes can share a column. The order of the columns is defined in the pipeline.stage file, which also controls the two character mnemonics (OSF stage) used in the OMG title bar and the meanings associated with each status. Each process will set status fields for the observation based on whether the processing was successful or not. The standard is:
- "w": waiting for the process,
- "p": processing data,
- "c": successful completion,
- "e": unsuccessful completion,
- "n": Not applicable,
- "x": Process died.
- DATASET: This field contains the name of the observation or dataset (gif9703). The OMG displays this in the "OBS" column. The default size of this field is 64 characters (changed from 23 in release 2.2), so this is the default maximum size of a dataset name.
- DATA ID: This field is called the datatype of the observation or dataset (GIF in this example). It is often used by processes to determine what kind of observation is coming down the pipeline, and whether that kind of observation is to be processed. The OMG displays this field in the "CLS" (class) column. The default size of this field is 3 characters.
- DCF NUMBER: This field contains an optional identifier of the observation (000). Called the Data Classification Field (DCF). The OMG allows the user to sort the display using this field. Consequently if there are meaningful attributes which can be used to classify the datasets, they can be set in this field. For example, one might use this field to specify the source of the dataset. The default size of this field is 3 characters. It is displayed in the "DCF" column of the OMG.
- COMMAND: This portion of the OSF is the command area (all underscores, or blank, in this example). This field provides the capability to SUSPend an observation. As an example, if it is known that a particular reference file is required by a calibration step for this one observation, this observation can be SUSPended in the pipeline before reaching calibration without affecting the processing of other observations. The OMG provides the capability both to SUSPend an observation and to RESUme it. The command is displayed in the "CMD" column of the OMG.
Can I modify how an Observation Status File is structured?
You can configure the sizes, locations, and formatting of the fields in an OSF for your pipelines by changing the default parameters in the file opus.env located in OPUS_OBSERVATIONS_DIR. The portion of this file related to OSF's looks like:
!
! OSF definitions
!
! The size of each OSF field must be specified here as must a template for
! composing a string representation of the OSF out of each field. The OSF
! fields that distinguish one OSF from another also must be specified.
!
! The formatting and keyword names are self-explanatory although it should
! be noted that each field must appear in the template once and only once,
! there must be at least one field labeled as "UNIQUE", and the template
! format and field sizes should be consistent with the blackboard
! implementation to be utilized (ie., appropriate for file names if BB_TYPE =
! FILE).
!
OSF.TEMPLATE_DELIMS = {}
OSF.TEMPLATE        = {TIME_STAMP}-{OBS_STAT}.{DATASET}-{DATA_ID}-{DCF_NUM}-{OBS_CMD}
OSF.UNIQUE1         = DATASET
OSF.UNIQUE2         = DATA_ID
TIME_STAMP.SIZE     = 8
OBS_STAT.SIZE       = 24
!DATASET.SIZE        = 23       VMS only
DATASET.SIZE        = 64
DATA_ID.SIZE        = 3
DCF_NUM.SIZE        = 3
OBS_CMD.SIZE        = 4
The comments above include the instructions for changing these parameters. The fields marked as "UNIQUE" are those used by the OPUS system to distinguish one OSF from another. This is important because duplicate OSF's are not allowed on the blackboard. It is not recommended that you change the unique fields although you are free to do so.
Also, note that the OMG does not support changes to these parameters! The next release of OPUS will include a new, Java-based OMG that will.
Before changing any of these parameters for a pipeline, be sure that there are no OSF's in your paths, otherwise they will not be recognized as OSF's after you make the changes.
How do I create an OSF?
% osf_create
   A path file must be specified (-p)
   Usage:
            osf_create -p pathfilename -f filename -t type
                    -n number -c column -s status

   Example:
            osf_create -p blue.path -f n32s1496
                    -t nic -n 123 -c DP -s p

   note: the path file must be in OPUS_DEFINITIONS_DIR
Note that the -c flag will default to the first column and multiple statuses can be specified:
          osf_create -p blue.path -f n32s1496
                   -t nic -n 123 -s ccw
How do I update an OSF?
- > osf_update
A path file must be specified (-p)
Usage:
OSF_update -p
pathfilename -f filename [-t type]
[-n number] [-m new_dcf] [-c column] -s status
Example:
OSF_update -p
blue.path -f n32s1496
-t nic -n 123 -c DP -s p
note: the path file must be in OPUS_DEFINITIONS_DIR
Note that the -c flag will default to the first column
in your PATH_pipeline.stage file, and
multiple status values can be specified:
          OSF_update -p blue.path -f n32s1496
                   -t nic -n 123 -s ccw
This results in an update to an existing OSF on the OSF blackboard described in the OPUS_OBSERVATIONS_DIR entry of OPUS_DEFINITIONS_DIR:blue.path. The OSF blackboard is searched for an OSF matching the DATASET (n32s1496), DATATYPE (nic), and DCF (123) values. If found, the STATUS field of the OSF is modified such that the first column is set to 'c', the second column to 'c' and the third column to 'w'. All other OSF status columns are unaffected.
How do I test for an Observation Status File?
% osf_test
   Usage:

osf_test -p pathfilename [-f filename] [-t type]


[-n number] [-c column] [-s status] [-m command] [-x timestamp]
 [-pr time status dataset dataid dcfnum command COLUMN]

   Example:
            osf_test -p blue.path -f n32s1496 -pr KW

   note: the path file must be in OPUS_DEFINITIONS_DIR
The utility provides a means of querying an OSF blackboard and printing information for selected OSFs. The entire OSF can be printed or only certain OSF fields can be printed, using the pr option and a fixed set of OSF keywords.
For example, to query the KW column of a particular dataset running in the sample pipeline, use
% osf_test -p g2f.path -f gif9506 -pr KW
cTo find the DATASET names for all OSFs that are in an error state in the KW stage, use
% osf_test -p g2f.path -c KW -s e -pr dataset
   gif9508x01
   gif9508x02
   gif9508x03
   gif9508x05
This tool is useful in scripts when actions to be performed depend on the state of processing.
How do I read the time stamp on an Observation Status File?
YYYY MM/DD HH:MM:SSand displayed in the "Start Time" column of the display. Outside of the OMG, you can use the utility time_stamp to interpret these numbers. For example:
%time_stamp 33DC9DC8produces the response:
date: 28-Jul-97 13:25:28
Can I monitor more than one pipeline or path at a time?
This is because the set of processing stages defined in the pipeline.stage files (usually) varies from path to path. However, you can monitor both pipelines simultaneously by running two copies of the OMG.
How do I view the "trailer" (or log file) of an observation?

This will create a separate Motif window that will contain the trailer file.
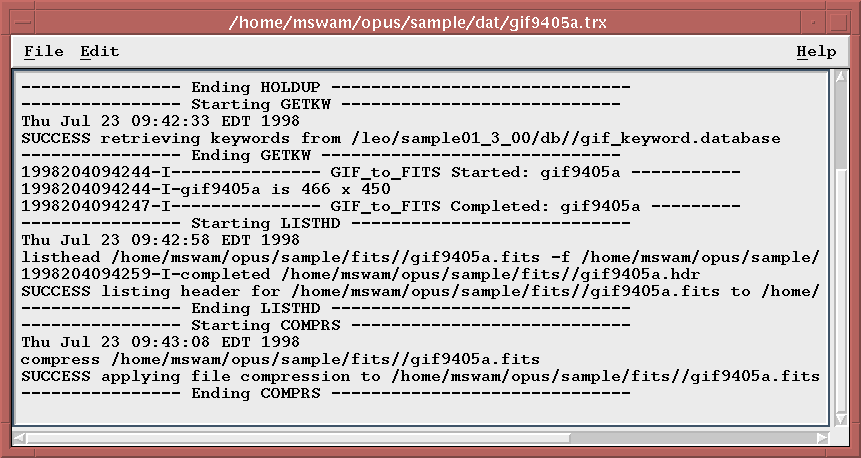
You will be able to scroll through the text, search for text, and also copy text to the clipboard for pasting elsewhere.
How do I view the FITS header of a FITS file in the observation dataset?

If only a single FITS file is found (located using the entries in the omg_view.dat file), this will create a separate Motif window that will contain the FITS header, as dumped by an OPUS tool called listhead. It lists the primary and all extension header keywords.
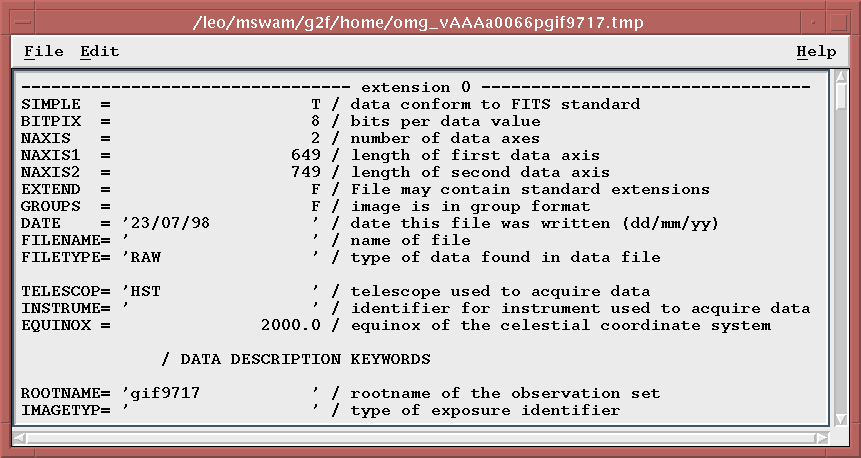
If multiple FITS files are found, then a selection box will be displayed allowing you to decide which FITS header is to be viewed. The selection box dialog will stay visible until the Cancel button is selected, allowing you to view multiple FITS file headers in separate windows.
Once a single file has been selected for viewing, you will be able to scroll through the text, search for text, and also copy text to the clipboard for pasting elsewhere.
How do I view the contents of ASCII files in the observation data set?

If multiple ASCII files are found (located using the entries in the omg_view.dat file), then a selection box will be displayed allowing you to decide which file is to be viewed.
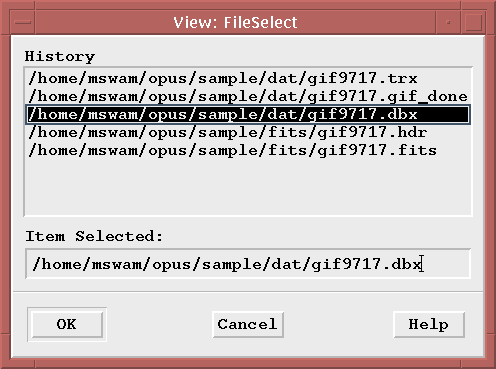
Once you make a single selection, a separate Motif window will be created that will contain the contents of the ASCII file.
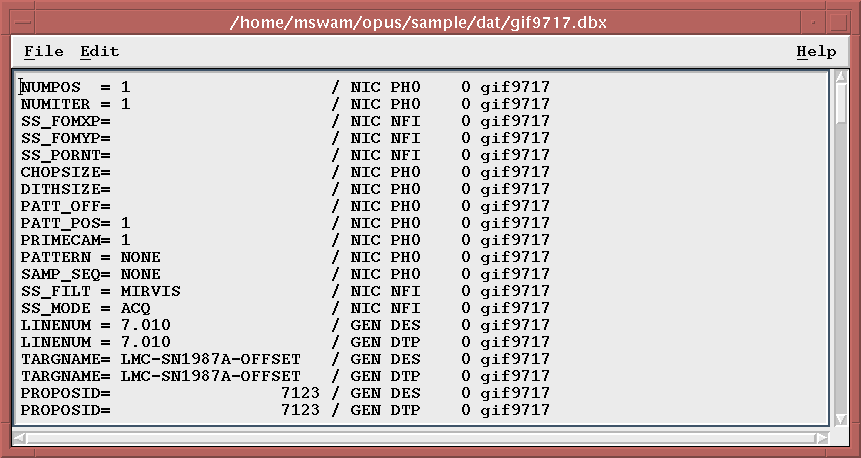
You will be able to scroll through the displayed text, search for text, and also copy text to the clipboard for pasting elsewhere.
The file selection box dialog will stay visible until the Cancel button is selected, allowing you to view multiple files in separate windows. Note that no file type checking is performed to ensure that you are trying to display an ASCII file, so nothing prevents you from displaying binary files as well (this is not recommended, however).
How does the OMG find the trailer, FITS, and ASCII files for viewing?
-
The OMG uses a configuration file to determine the directory and file
mask to use to display a trailer file, as well as the other types of files
viewable by the OMG. The file is called omg_view.dat and you will
find a path-specific version in the sample
pipeline called g2f_omg_view.dat in the UNIX subdirectory
of OPUS_DEFINITIONS_DIR. Here is a sample:
! This is the RES file used for viewing a text file in the OMG. It specifies
! the type of files and the location of the file to be displayed for
! each data class. The .Search1 specifies the resources for the file to be
! displayed. If the Search1 file is not available, the Search2 file is
! used, if Search2 is not found, then Search3 is used, etc.
!
!_--------------------------------------------------------------------------
GIF.Search1.trl.filespec = <root>.trx
GIF.Search1.trl.name = NAME
GIF.Search1.trl.dir = gif_data
GIF.Search1.fits.filespec = <root>.fits
GIF.Search1.fits.name = NAME
GIF.Search1.fits.dir = fits_data
GIF.Search1.ascii.filespec = <root>*
GIF.Search1.ascii.name = NAME
GIF.Search1.ascii.dir = gif_data
GIF.Search1.ascii.filespec = <root>*
GIF.Search1.ascii.name = NAME
GIF.Search1.ascii.dir = fits_data
This file contains a set of entries for each data class processed by a pipeline. For the sample pipeline there is only one data class, GIF. Multiple search hierarchies can be specified in the Search1, Search2,...SearchN entries, and they can have different directory and filemasks if desired. For the sample pipeline only one hierarchy is used. Multiple hierarchies can be used to provide "second-choice", "third-choice", etc. entries for locating a file. For example, if a pipeline produces several trailer files in different directories at different stages of processing (which the HST pipelines do), you may want to say "Display the trailer from location 1 if it exists, otherwise try location 2, etc.". As soon as one or more files are found at a particular search level, then further levels will not be searched for that class.
There are three (3) separate data types (trl, fits, and ascii) that correspond to the three types of menu selections under the View submenu of the Utilities option. For example, if you select View Trailer, each of the trl entries at a particular search level is used to locate a file. If a file is found, it is added to the list of possible files for viewing. Multiple qualifying files result in the display of a selection box for the user to choose a single file for viewing. No qualifying files result in an attempt to locate entries for the next search level. Once all search levels are exhausted and no files have been located, an error message appears in the OMG log area of the display

Each of the different data types is handled in a special way by the OMG. The ascii type results in a simple text window display containing the file contents. The fits type results in a display of the FITS file header keywords and values, as dumped by the OPUS tool listhead. The trl type either results in a simple text window, if the trailer is found in ASCII format, or a dump of a FITS-format trailer file using the OPUS tool listtra.
You will notice in the sample above, two sets of ascii entries at the same search level. This indicates that all files found in these two directory locations will be displayed in a selection box for the user to choose which file to view. Even non-ASCII files will be listed, using the wildcards as shown, though only true ASCII files will be displayed properly.
A convenient way to add new entries to the omg_view.dat file for a new data class is to copy a set that already exists and modify the class, directory, and filespec. In addition, if symbols that resolve to directories in the path file are used, then the location of the trailer search directory will automatically adjust as the monitored path is changed.
Can I stop a specific observation from processing further?
To do this, select the observation(s) with your mouse (this will highlight the selected line(s)) and then click on the "Suspend Selected" option under the "Manage" pull down menu.
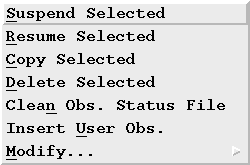
Choosing "OK" when asked for confirmation of the above action will update the corresponding OSFs with the string "halt" in the command section of the OSF. You will notice the change in the OMG window the next time the screen is refreshed.

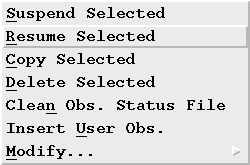
The "halt" command will alert the processes polling for observations to skip the selected observation. The observation(s) can then be resumed by highlighting the pertinent observations in the OMG display, selecting "Resume Selected" from the "Manage" menu, and choosing "OK" in the confirmation dialog.
How do I tell if an observation has encountered a processing problem?

Additionally, there is a count of "Trouble" observations at the bottom of the OSF window. If you see columns containing "e" or "x", but the Trouble counter doesn't seem to be registering them, check the definitions in the pipeline.stage file for each stage. It should define letters that indicate trouble using the TSTATUS class.
You might get information about what caused the problem by viewing the observation trailer, or by examining the process log file for the stage that failed.
Is there a way to determine the meaning of a status of an observation?
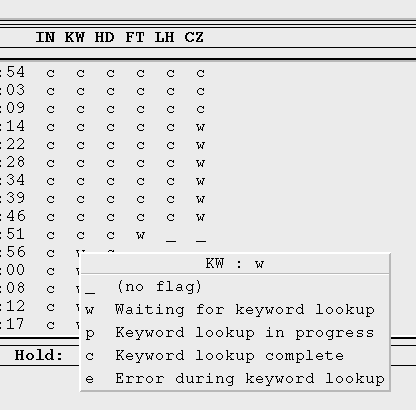
Selecting one of those menu items will change the current status of the OSF to the selected value after confirmation of that change in a dialog box.
You must click directly above an OSF's status value in order to bring up the menu. If you click between status values, or elsewhere in the OMG with the third mouse button, the menu will not appear and there will be a three second delay while the mouse event clears itself (this is a side effect of Motif, not the OMG). The only exception to this is clicking a stage title with the third mouse button; in this case, the description for that stage as defined in the pipeline.stage file is displayed next to the title.

How do I change the status of one or more observations?
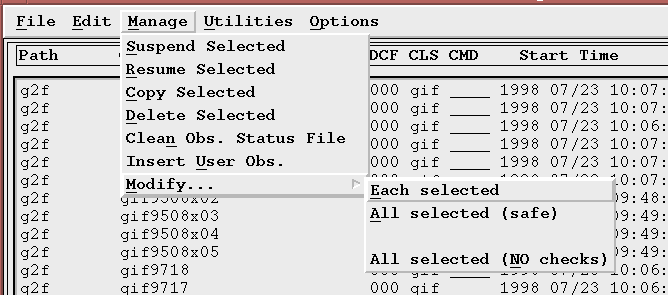
There are three (3) possible choices:
- Results in a separate Motif window for each observation selected. Any changes to the status fields must be made separately for each OSF selected.
- Results in a single Motif window displaying the current status values of the first OSF selected. Any status modifications requested by using the dialog will be applied to all selected OSFs that have the same current status values as the first OSF selected. This is considered "safe" because if you happen to pick up a few OSFs with your mouse selection that you did not intend to modify, they most likely will have different status files than the first OSF selected and they will not be modified. A message will appear in the OMG log window indicating that the OSF was skipped if this happens.
-

- Like All selected (safe), this results in a single Motif window displaying the current status values of the first OSF selected. In this case, however, once status modifications are requested through the dialog, all of the status values in the "New" column (changed or not) will be applied to all selected OSFS, regardless of their current status. You can drastically alter the status of a set of OSFs using this option, so be especially careful when selecting your OSFs to mark only the ones that you really want to change. This option is used to give a number of OSFs a common status no matter what state they are currently in. There is a way to disable this option if you do not want it to be selectable.
For all three modification modes, the modification dialog appears similar to this,
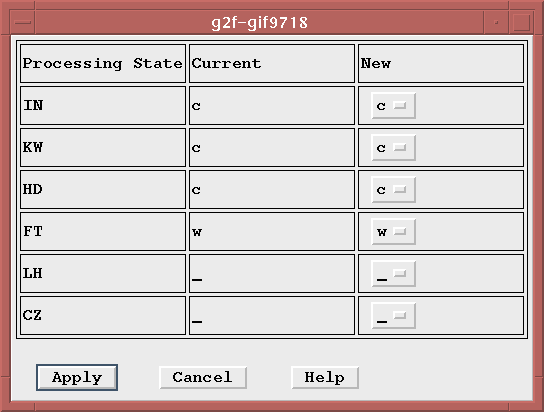
Click on the button next to the column heading that you wish to change. A list of available column values will be displayed-- simply click on the desired value. Follow this procedure to modify as many columns as desired. Once you are finished, click on the "Apply" button located at the bottom of the modify window (It will appear as "Apply (safe)" and "Apply (NO CHECKS)" for the global modification modes). This will make the desired changes to the OSF(s) and then the window will disappear.
The list of available column values for each pipeline stage is determined
by entries in the pipeline.stage file. If you
want to modify a certain OSF column to a value that does not appear in
the menu of possible selections, then the pipeline.stage file needs to
be updated with this new value.
How do I disable the "NO checks" option of the "Modify/All selected" menu selection?
- *AllSelectedNoChecks.sensitive : 0
This will "grey-out" the "NO checks" Modify option, prohibiting its use.
Can I change the frequency at which the display is updated?

The refresh rate (default and user defined) can be modified/added to by editing the omg.dat file in your home directory. The relevant lines are:
   *DelayButton1.labelString : 6 sec
   *DelayButton2.labelString : 10 sec
   *ListForm*defaultDelay : DelayButton2
In this example the display will be refreshed every 10 seconds. You also can specify DelayButton0 as the default delay,
*ListForm*defaultDelay : DelayButton0which instructs the OMG not to update the display at all.
Note: There is a limit to the number of delay button settings the user may want to define of 5.
Can I turn the display update off?
The first choice in the delay button cascade menu is the "Off" option.
Can I filter the types of Observation Status Files that are displayed?
The OMG provides a method for categorizing OSFs
as they are processing. Four (4) categories are provided:
- Processing
- Trouble (or Error)
- Hold
- Complete
OSFs are assigned to these categories by the values of the STATUS fields. For example, Trouble or Error OSFs are usually determined by checking for 'e' or 'x' in the STATUS field, while Processing OSFs might have a 'p' or 'w' in the STATUS field. Hold OSFs are determined by examining the COMMAND field for 'halt'. The OSF STATUS values that identify a category are specified in the pipeline.stage file. For more information on how to change the default categorization see the pipeline.stage file description.
OSFs are classified into one (and only one) of these categories and count totals are displayed at the bottom of the OMG:

The order of precedence used in the classification is Error, Hold, Processing, Complete. If an OSF meets the criteria for the Error class, then it will not be checked to see if it also falls into the other classes. It is possible to have an OSF meet the criteria for several of the classes simultaneously, but only the highest precedence class is counted.
The OMG provides a set of toggle buttons that allow you to filter out any of these categories from the display. Note, however, that only the display is filtered-- the counters always maintain an accurate count of all OSFs on the blackboard (the counter label will include the flag "FILTERED", however). Under the File menu is Select OSFs...,
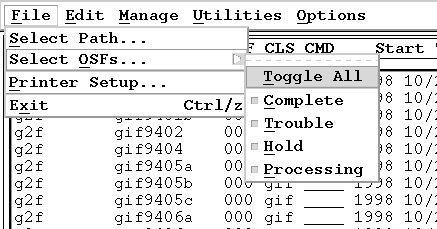
and it provides a set of toggle buttons that will control which OSFs are displayed.
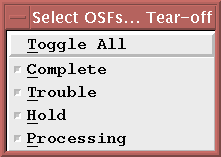
This pulldown selection is on a "tear-off" menu. Tear it off by clicking on the dashed line in the pulldown. This detaches the pulldown menu from the menu bar and allows you to place it anywhere on your screen.

How do I delete an OSF, and how does this affect the data that it refers to?
$OPUS_OBSERVATIONS_DIR/[path]_obsfil_delete.dat file,
select it, then click "Delete Selected" in the "Manage" menu. Alternatively,
you can select the OSF, then drag it to the trash can icon to the right of
refresh interval button using the middle mouse button.Can I copy part of the OSF listing to the system clipboard?
How do I specify printers and a print command?
Certain windows brought up by the OMG allow printing of their contents. These windows will contain a "Print" command under their "File" pull down menu. When "Print" is selected, a dialog containing printer names appears. At this point you choose to which printer the window contents are sent. The list of printers in this dialog is determined by the "Printer setup..." option under the OMG's "File" pull down menu.
Selecting "Printer setup..." brings up a dialog containing a list of printer names, a text field in which to "Add/Remove" printers, and a text field in which you define the command issued to the operating system to print the window contents:
![[OMG Printer Setup window]](gif/pmg_printer_setup_window.gif)
Note that the method used by the OMG to send data to a printer is to append a printer chosen from the list to the specified print command. As such, the last option to the print command must signal the operating system that the target printer is specified next. For example, in System V based Unix, the printer option is specified in the "lp" command with the "-d" option. Hence, the last option in the print command must be "-d", as in "lp -m -d"; "lp" alone is not acceptable.
To add a printer to the list, type its name in the "Add/Remove" text field, then press enter. The printer will be added to the list. To remove a printer from the list, select it in the list by clicking once on its name. This will remove the printer from the list, placing it in the "Add/Remove" text field. At this point it can be edited and re-entered to the list, or ignored.
Press "OK" to save any changes you make. Note that these changes do not take effect until the next time the OMG is run. To negate any changes made, select "Cancel".
How do I change the colors used on the display?
   *background: lightgray
   *foreground: black
   *borderColor: gray
What controls the order of the observations in the OMG?

What configuration files control the functions of the OMG?
The file [path]_obsfil_complete.dat contains an OSF file mask for each data class. When an OSF for a given dataset matches its corresponding file mask, it becomes a candidate for "cleaning". The "[path]" in the file spec above is an optional pathname that can be used to identify a path-specific .dat file. If the path is left off, the default file obsfil_complete.dat is used.
The "mask" can be formed using components of the OSF observation name or "root" name. This mask is specified by the .filespec keyword in each obsfil resource file:
.filespec = <root>*.*
Portions of the observation name can be used to construct the file mask.
For instance, if only the first eight characters are significant, then
you would want to specify:
.filespec = <root[1:8]>*.*
as the file mask.
When a set of observations is selected for cleaning, the data class of each observation (taken from each OSF) is used to locate the file mask in the corresponding entry in [path]_obsfil_complete.dat. If the selected observation's OSF matches the file mask, then the OSF is removed from the OPUS blackboard (OPUS_OBSERVATIONS_DIR in the path file). Only the OSF is removed; the dataset itself is not altered.
Inspection of the g2f_obsfil_complete.dat file demonstrates that you can assign the same file mask to any number of data classes. If you want to add a new data class, just follow the example set by existing entries.
The file [path]_obsfil_copy.dat contains a file mask and symbolic directory names for each data class that indicate where the pipeline data for the data class are stored. When an observation is selected for copying, the symbolic directory and file mask for the data class are used to locate the pipeline dataset, then dataset is copied to the directory specified by the user in the copy dialog window.
The file [path]_obsfil_delete.dat contains a file mask and symbolic directory names for each data class that indicate where the pipeline data for the class are stored. When an observation is selected for deletion, the symbolic directory and file mask for the data class are used to locate then delete the pipeline dataset. The OSF is removed as well.
The file [path]_omg_view.dat contains
entries which control how file contents are viewed using the Utilities.View
menu options. See the section on the omg_view.dat
file for more information.
Is there any limit on the length of an observation "name"?
   gif9401b.dat
   gif9443d.dat
   gif9507.dat
   gif9502b.dat
   gif9525a2.dat
The length of the filename root ranges between 7 and 9 characters. That's well below the 64-character maximum, so these conform to the OMG requirements for displaying observation names.
The actual number of characters displayed in the OMG's "OBS" column
changes each refresh cycle to accommodate the dataset with the longest
name. However, the resource "maxObsNameLength" in the file
~/omg.dat sets a hard upper limit to the "OBS" column width: any
dataset name longer than this value is truncated and a continuation
character, ">", is displayed following the dataset name. You can view
the complete dataset name for truncated items in the "OBS" column by clicking
on them with the third mouse button.
What is the pipeline stage file?
Note that each path is associated with the pipeline stage file defined by its STAGE_FILE keyword or the default naming convention [path]_pipeline.stage (use of the latter requires that the file be located in OPUS_DEFINITIONS_DIR).
This is an example of the g2f_pipeline.stage file distributed with the sample pipeline:
!
! g2f_pipeline.stage
!
! Pipeline stage files define the title, description, and status values
! for each stage of a data processing pipeline. The number of stages is
! defined by the required key NSTAGE.
!
! Each stage entry begins with the class STAGEnn where nn is a number between
! 01 and 99 (the number must be formatted as two digits) that indicates where
! a stage falls in the processing order (the first stage is 01, the second 02,
! and so on). Valid subclasses include:
!
! .TITLE        (required) a two character title for the stage
! .DESCRIPTION  (required) a short description for the stage
! .PROCESSnn    (optional; nn : 01 to 99) a process name for that stage
!
! (NOTE: all values containing spaces must be enclosed in single quotes)
!
! In addition, the characters that indicate the status of a dataset with
! respect to each stage are defined in this file. There are four subclasses
! to which a status character can be assigned to:
!
! .CSTATUS.c    status indicates "complete" in this stage
! .TSTATUS.c    status indicates "trouble" in this stage
! .PSTATUS.c    status indicates "pending" in this stage
! .NSTATUS.c    status does not fall into any category
!
! where c is the status character. The value for each of these entries
! should be a short description of its meaning. For example,
!
! STAGE01.CSTATUS.P = 'Processing dataset'
! STAGE01.TSTATUS.E = 'Fatal error while processing dataset'
! STAGE01.NSTATUS.W = 'Waiting for processing'
!
! Status characters must be categorized consistently across all stages; if
! a character is assigned as a CSTATUS for one stage, that same character
! cannot be assigned to TSTATUS, PSTATUS, or NSTATUS in another stage.
!
!------------------------------------------------------------------------
NSTAGE = 6
STAGE01.TITLE = IN
 STAGE01.DESCRIPTION = 'GIF INIT'
 STAGE01.CSTATUS.C = 'GIF file recognition complete'
 STAGE01.TSTATUS.X = 'External process controller error'
STAGE02.TITLE = KW
 STAGE02.DESCRIPTION = 'Database select'
 STAGE02.NSTATUS.W = 'Waiting for keyword lookup'
 STAGE02.PSTATUS.P = 'Keyword lookup in progress'
 STAGE02.CSTATUS.C = 'Keyword lookup complete'
 STAGE02.TSTATUS.E = 'Error during keyword lookup'
STAGE03.TITLE = HD
 STAGE03.DESCRIPTION = 'Hold up'
 STAGE03.NSTATUS.W = 'Waiting for hold up'
 STAGE03.PSTATUS.P = 'Delaying processing for a while'
 STAGE03.CSTATUS.C = 'Hold up complete'
 STAGE03.TSTATUS.E = 'Error occurred during hold up'
 STAGE03.TSTATUS.X = 'External process controller error'
STAGE04.TITLE = FT
 STAGE04.DESCRIPTION = 'GIF to FITS'
 STAGE04.NSTATUS.W = 'Waiting for conversion to FITS'
 STAGE04.PSTATUS.P = 'Conversion of GIF to FITS in progress'
 STAGE04.CSTATUS.C = 'Conversion to FITS file complete'
 STAGE04.TSTATUS.E = 'Error occurred during conversion'
STAGE05.TITLE = LH
 STAGE05.DESCRIPTION = 'List FITS Header'
 STAGE05.NSTATUS.W = 'Waiting for FITS header listing'
 STAGE05.PSTATUS.P = 'Generating FITS header listing'
 STAGE05.CSTATUS.C = 'FITS header listing complete'
 STAGE05.TSTATUS.E = 'Error occurred during FITS header listing'
 STAGE05.TSTATUS.X = 'External process controller error'
STAGE06.TITLE = CZ
 STAGE06.DESCRIPTION = 'File Compression'
 STAGE06.NSTATUS.W = 'Waiting for file compression'
 STAGE06.PSTATUS.P = 'Compressing FITS file'
 STAGE06.CSTATUS.C = 'FITS file successfully compressed'
 STAGE06.TSTATUS.E = 'Error occurred during file compression'
 STAGE06.TSTATUS.X = 'External process controller error'
![[OPUS]](gif/opus.gif)