![[OPUS]](gif/opus.gif)
What is the PMG?
![[Initial PMG window]](gif/pmg_full.gif)
Do I need any software not provided on the OPUS CD to run the PMG?
How do I start the Process Manager?
![[OpusManagers Start Menu]](gif/pmg_start_menu.gif)
You can drag those icons to your Desktop (with the right mouse button) to put a Shortcut there:
![]()
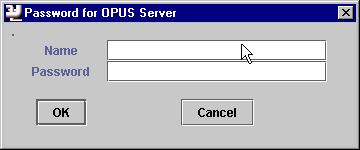
The first thing you should see after double clicking on the PMG icon is the OPUS splash screen, and then an OPUS Server login dialog:

The OPUS Managers are able to work over the network only if they have a valid connection with the OPUS CORBA server. That server needs to have been installed, and needs to be running for the OPUS Managers to have something to talk to.
You need to enter the proper node name where the server is running for the OPUS Managers to find that server.
If the servers are not running, a dialog will popup after you attempt to login telling you the manager could not find the servers:
![[Image of No Server Dialog]](gif/noserverdlg.gif)
Click OK, start the servers, and start the Manager again.
Once you have entered the full node name of the server, you now are required to enter your name and password on that server so the OPUS Managers can log into that account and establish a connection.
Note: if you are using Unix, you can start up the OPUS Process Manager by entering:
% ~/PMGThis is a link to the installed task which executes the Java PMG.
What's the password dialog for?
The name and password being requested are the name and password for the system
on which the OPUS servers are running. Note that this information may be
different from your user name and password on the system running the managers.
In fact, it is possible for anyone to connect to your servers with
the managers provided that you give them your account name and password.
A note of caution: while the password is hidden from the display, and not logged in the log file, neither is it encrypted.
What is a process status entry?
The Process Manager (PMG) uses these entries to control and communicate with the computer processes running within the OPUS pipeline.
The process status entry is parsed by the PMG to determine what information is to be displayed in the PMG GUI window. The PMG allows the user to modify certain fields in the process status entry to control how the process functions.
The following information is contained in a process status entry:
   00006426-getkw___-idle___________.340d7ed9-g2f______-area51-____
   |-- 1 -| |-- 2 -| |----- 3 -----| |-- 4 -| |-- 5 --| |- 6 | | 7|
- PID: This portion of the process status entry contains the process ID (00006426) assigned by the system at run time (in hex format for historical reasons). The process ID is used to distinguish between multiple versions of the same process running on the same node.
- PROCESS: This field of the process status entry reflects the process name (getkw). This information is displayed under the "process" column of the PMG display. The default size of this field is 9 characters, so this is the default maximum size of a process name.
- STATUS: This portion of the process status entry contains the status of the pipeline process ("idle"). Some common values of this field are: working, suspended, idle, iowait, starting, absent (process has exited due to an error), or the name of the dataset that the process is currently working on. This information is displayed under the "proc_stat" column of the PMG.
- START TIME: This portion of the process status entry contains a time stamp (340d7ed9) representing when the process was started (in hexadecimal format). This information is converted to user-friendly date-time text and is displayed under the "start_time" column of the PMG.
- PATH: This portion of the process status entry contains the name of the path under which the process is running (g2f). This information is displayed under the "Path" column of the PMG. The default size of this field is 9 characters, so this is the maximum default size of a path name root.
- NODE: This portion of the process status entry contains the name of the machine on which the process is running (area51). This information is displayed under the "Node" column of the PMG. Note: the default size of this field is 20 characters, so this is the default maximum node name length.
- COMMAND: This portion of the process status entry is the command area. This tells the process to perform a specific task. In this example, the process status entry contains only underscores (i.e., is "blank"); therefore, the process will continue its normal operation. Possible values for this field are: halt, susp, resu, and init. The commands are issued using the "Manage" menu selection of the PMG menu bar. The command values will tell the process to terminate processing, suspend processing, resume processing, or reinitialize the process, respectively. This information is displayed under the "proc_cmd" portion of the PMG.
Can I modify the structure of a process status file?
You can configure the sizes, locations, and formatting of fields in a process status entry for your pipelines by changing the default parameters in the file opus.env located in OPUS_DEFINITIONS_DIR . The portion of this file related to process status entries looks like:
!
! PSTAT definitions
!
! The size of each PSTAT field must be specified here as must a template for
! composing a string representation of the PSTAT out of each field. The PSTAT
! fields that distinguish one PSTAT from another also must be specified.
!
! The formatting and keyword names are self-explanatory although it should
! be noted that each field must appear in the template once and only once,
! there must be at least one field labeled as "UNIQUE", and the template
! format and field sizes should be consistent with the blackboard
! implementation to be utilized (ie., appropriate for file names if BB_TYPE =
! FILE).
!
PSTAT.TEMPLATE_DELIMS = {}
PSTAT.TEMPLATE        = {PID}-{PROCESS}-{PROC_STAT}.{START_TIME}-{PATH}-{NODE}-{PROC_CMD}
PSTAT.UNIQUE1         = PID
PSTAT.UNIQUE2         = NODE
PID.SIZE              = 8
PROCESS.SIZE          = 9
PROC_STAT.SIZE        = 15
START_TIME.SIZE       = 8
PATH.SIZE             = 9
NODE.SIZE             = 20
PROC_CMD.SIZE         = 4
The comments above include the instructions for changing these parameters.
The fields marked as "UNIQUE" are those used by the OPUS system to distinguish
one process status entry from another. This is important because duplicate
process status entries are not allowed on the blackboard. It is not recommended
that you change the unique fields although you are free to do so.
Before changing any of these parameters for a pipeline, be sure that
there are no process status entries in your
OPUS_HOME_DIR,
otherwise they will not be recognized after you make the changes.
In addition you should make sure that the OPUS CORBA servers are not running.
How do I tell the PMG which paths to monitor?

Just click on the tab for a path to see its active processes.
How do I select a new set of nodes?
Next, choose "Select Nodes" from the "Tools" pull down menu:
![[Select Nodes]](gif/pmg_nodeselect.gif)
This brings up a dialog listing all of the nodes that OPUS knows about (this information comes from the /etc/hosts file on the system running the server):
![[PMG Define Nodes window]](gif/pmg_nodelist.gif)
Use the mouse (holding the Ctrl key down) to select any number of nodes
for your personalized list. That list of nodes will be used for your
current session of the PMG. If you want to save that list in your
personalized environment, use "File.Save".
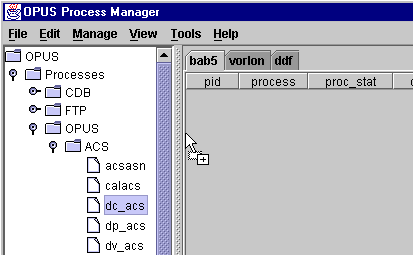
How do I start up a process?
![[OPUS folder]](gif/pmg_processes.gif)
![[Processes sub-folder]](gif/pmg_processes2.gif)
![[OPUS sub-folder]](gif/pmg_processes3.gif)
Finally, double-click on a particular class to view the processes which are available in that class. If you cannot see the full name of the process, you can move the stippled slider and enlarge your view of the process tree.
![[ACS CLASS]](gif/pmg_processes4.gif)
![[Widen window to view all of ACS CLASS]](gif/pmg_processes5.gif)
To select a single process, just drag it from the process tree to the path display:
When you release the mouse button, a new dialog will be displayed. This allows you to select a node, and the number of instances of this process that you wish to start on that node:
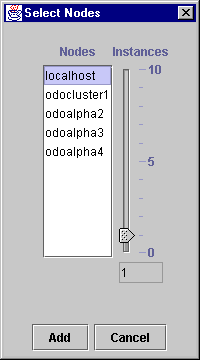
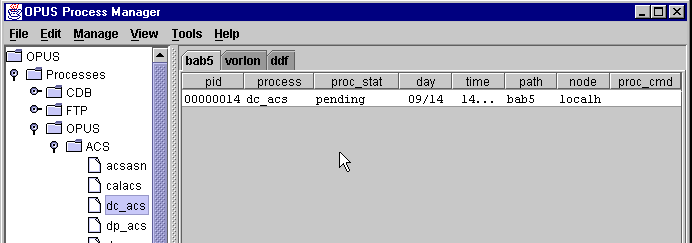
You can add a single process by clicking the "Add" option, or move the slider to indicate how many instances of the process you want. When you click on the "Add" option, the Process Status information will appear in the path display: Note that the process is "pending" which indicates that it is not active yet.
You can select multiple processes from the tree by using the shift or Ctrl keys when you are making your selections. Be careful when you start your drag; if you start the drag operation when the pointer is over a task name, then you might accidentally remove your multiple selection and have only a single process to drag. To drag a multiple selection, put the cursor in a free area of the tree and start your drag there.
Note that you can drag a whole class of tasks to a path, which is useful
if you want all members of that class.
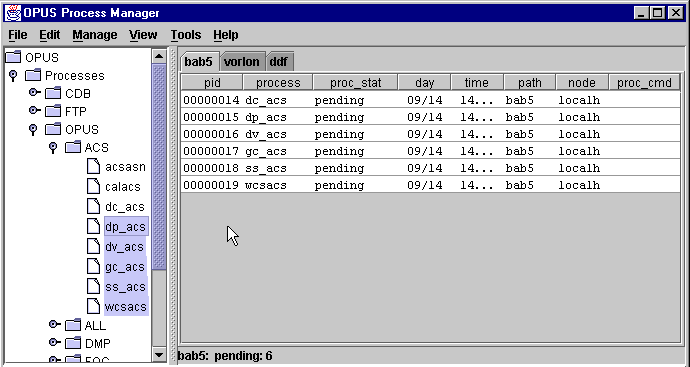
What if I make a mistake, how do I remove a pending task?

How then do I actually start the processes?

How do I terminate a running process?


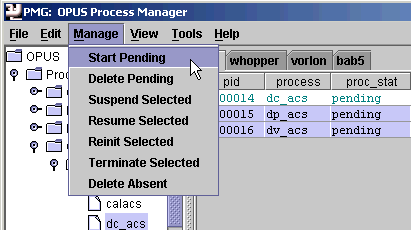
Can I suspend a specific process in the pipeline?
![[Manage Menu with Suspend Selected]](gif/pmg_suspend1.gif)
Note: Unlike the days of the Motif managers, you should never manually rename the process status entry. Although there is such a file located in your OPUS_HOME_DIR which reflects all the information in a PSF, that file is just a backing store for the blackboard manager; the "real" information is maintained internally by the CORBA server. Attempts to modify that backing store might have unwanted effects on the system.
How do I resume a suspended process?
How do I bring all processes down?
My Selections are disappearing!
![[Tools/Pause Listener]](gif/pauselistener.gif)
![[Tools/Resume Listener]](gif/resume.gif)
![[Paused listener]](gif/paused.gif)
What is a pipeline?
How do I define a pipeline?
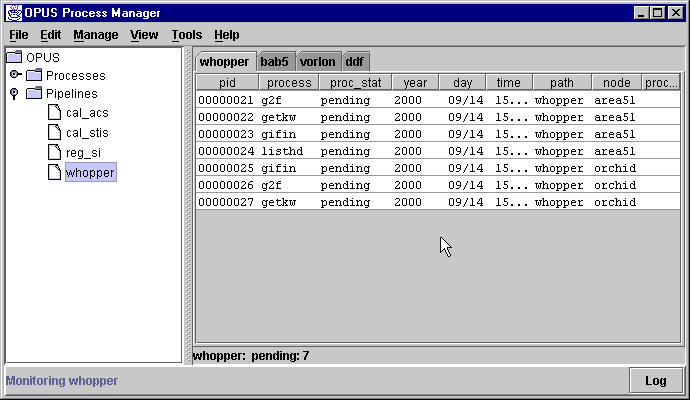
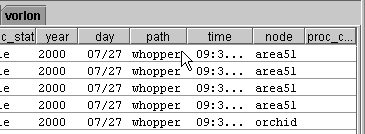
   g2f         whopper    area51
   getkw       whopper    area51
   gifin       whopper    area51
   listhd      whopper    area51
   gifin       whopper    orchid
   g2f         whopper    orchid
   getkw       whopper    orchid
The first column contains the process name (g2f for the first line). The second column contains the path in which the data will be processed (whopper). The third column contains the name of the machine on which the process will run (area51 for the first line).
So, if this pipeline file were to be used, the PMG would start the process
g2f
running under the whopper path on the area51 machine (and so on for the
remaining lines).
How do I create a pipeline file?
process_name path_name node_nameAs indicated in the example above, you should use lowercase for each of the fields. The columns are space delimited and any number of spaces can be used. Remember that the filename must be of the form *.pipeline. The file should be moved to the OPUS_DEFINITIONS_DIR directory for the PMG to find it.
It should be mentioned that the order in which the processes appear
in the pipeline file is arbitrary. In other words, the processes do not
have to be listed in the order in which they will be executed in the pipeline.
Can I save the list of processes in the PMG as a pipeline definition?
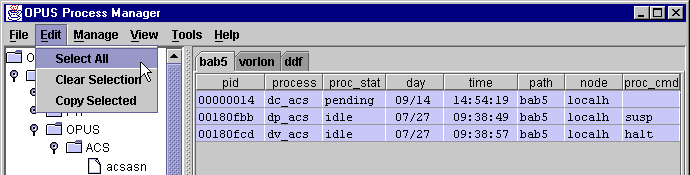
Select the processes you want to save for a particular path. An easy way to select all the processes is "Edit.Select All". Then choose "Save Pipeline" in the "Tools" menu.
![[Save Pipeline]](gif/pmg_savepipe.gif)
How do I load a saved pipeline definition?
![[Load Pipeline]](gif/pmg_pipeline1.gif)
To inspect any one pipeline, double click on its name. This brings up a display of the contents:

Note that this standard file display has a "Copy" button. This will copy the file being displayed to the Clipboard. From there you can paste it in you favorite editor, or mail it to your boss.
How do I start the pipeline?
OK. I did that, but nothing happened! Now what?

How do I remove a path from my PMG display?
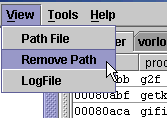
The path will reappear the next time you run the PMG unless you delete
the
path file from your OPUS_DEFINITIONS_DIR.
How do I remove a column from the PMG?
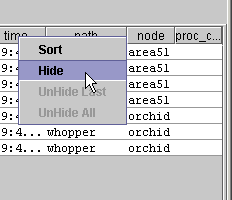
If you want to restore a hidden column, right click on the column where
you want to insert the hidden column. Select "UnHide Last" and the
hidden column will reappear to the left of the selected column. In
the example below, the "path" column was hidden. Then it was placed
to the left of the "time" column by right clicking on "time" and selecting
"UnHide Last".
Note that you can easily move any column anywhere you want it on the display. Just drag the column header to the position you want the column to appear. As noted above, any column can be resized as well by dragging the divider between adjacent columns.

Can I add a path to the PMG display?
How do I get help to work?
unix.browser.wrapper=/opt/X11R5/bin/netscape
How do I know if a task exits abnormally?
![[PMG with Absent Process]](gif/pmg_absent.gif)
What do I do if a process exits abnormally?
How do I view the log file for a particular process?
- select the desired process with the mouse and, under the "View"
pull down menu, select "LogFile"
![[PMG Utilities Menu with Show Log chosen]](gif/pmg_viewlog.gif)
- Or, simply double-click on the desired process
Either action causes another window to be created containing the log file for
the selected process. The window initially displays the end of the file
since pertinent error messages will have just been written there.
How do I save my preferences?
<username>PMG.ini
| Platform | user.home |
| Windows 2000 | C:\Documents and Settings\<username>\OPUSDATA |
| Windows NT | C:\Winnt\Profiles\<username>\OPUSDATA |
| Windows 98 | C:\Windows\OPUSDATA |
| Unix | ~/OPUSDATA |
The initialization files are formatted as simple keyword = value Java properties. The following keywords are currently defined in the PMG.ini:
#For unix your default browser is specified here for the help command
unix.browser.bin=/opt/X11R5/lib/X11/netscape/v47/netscape
unix.browser.wrapper=/opt/X11R5/bin/netscape

#this is the list of status values which will be displayed for each path
status_values=idle,processing,absent,iowait,suspended,halted,pending,starting

#omit this line unless you want to see all the debugging messages
#MessageLevel=debug

#if you want to restrict the Manage menu to only one user, put the name here
PermitManage=all
After the PMG.ini file is loaded, the managers will look for a user's file of preferences. This file is named
<username>PMG.iniThat file is saved in your preferences directory and contains your overrides as well as definitions of how the display should appear.
The file pmg_restrictions.dat which is located in the OPUS_DEFINITIONS_DIR contains the control necessary for you to limit the number of tasks.
The syntax of entries is:
PROCESS.PATH.NODE = NUM_COPIESwhere
- PROCESS = name of pipeline process (same as resource filename)
- PATH = name of path file in which the restriction occurs
- NODE = name of machine on which the restriction occurs
- NUM_COPIES = number of copies of the process allowed
For example,
gifin.g2f.* = 1   !Allows only 1 instance of gifin in g2f path across all cpus
mytask.*.* = 1    !Allows only 1 instance of mytask in all paths across all cpus
It is the CORBA server which uses this file to constrain the number of applications running. The PMG can request a larger number of instances to be started, but if there is a restriction on that process, the Server will return an error. If such a request was rejected, a message will be placed in the log file, and the PSF for the process will remain in the pending state.
Without getting into too much detail, the MGRBeans are standard Java classes which implement a simple interface:
public interface MGRBean {
    public void setFrame (MGRFrame f);  //get a reference to the MGR container
    public String getPreferredMenu();   //tell the MGRs which menu contains you
}
Each new class will appear in it's preferred menu, and will have access to
the facilities provided by the Java managers. Contact
opushelp@stsci.edu
if you need help in writing your own MGRBeans.