![[OPUS]](gif/opus.gif)
What are observations?
What is the OMG?
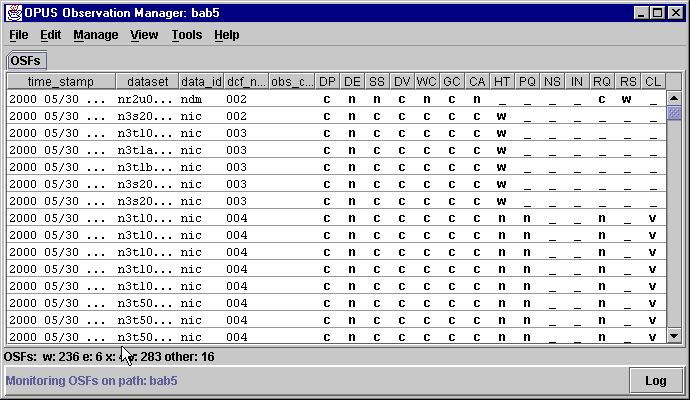
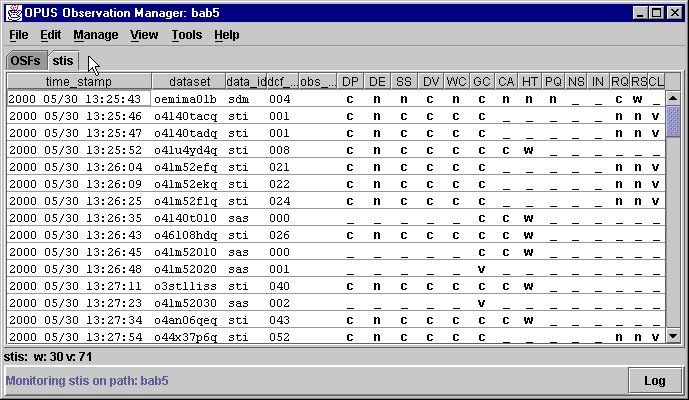
The OMG is an Observation ManaGer, a Graphical User Interface (GUI) that allows the user to control the datasets being processed by a pipeline. The OMG controls and monitors what is happening in the pipeline through Observation Status Files (OSF). An example of an OMG display on a real pipeline looks like this:

Do I need any software not provided on the OPUS CD to run the OMG?
How do I start the Observation Manager?
![]()
You can drag those icons to your Desktop (with the right mouse button) to put Shortcuts there:

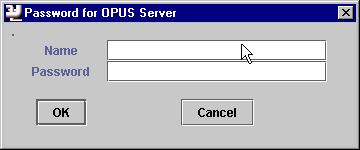
Double-click or select OMG from the OpusManagers Start Menu and first thing you should see is the OPUS splash screen, and then an OPUS Server login dialog:

The OPUS Managers are able to work over the network only if they have a valid connection with the OPUS CORBA server. That server needs to have been installed, and needs to be running for the OPUS Managers to have something to talk to.
You need to enter the proper node name where the server is running for the OPUS Managers to find that server.
If the servers are not running, a dialog will popup after you attempt to login telling you the manager could not find the servers:

Click OK, start the servers, and start the Manager again.
Once you have entered the full node name of the server, you now are required to enter your name and password on that server so the OPUS Managers can log into that account and establish a connection.
Note: if you are using Unix, you can start up the OPUS Process Manager by entering:
% ~/OMGThis is a link to the installed task which executes the Java OMG.
What's the password dialog for?
What happens after I am properly authorized?
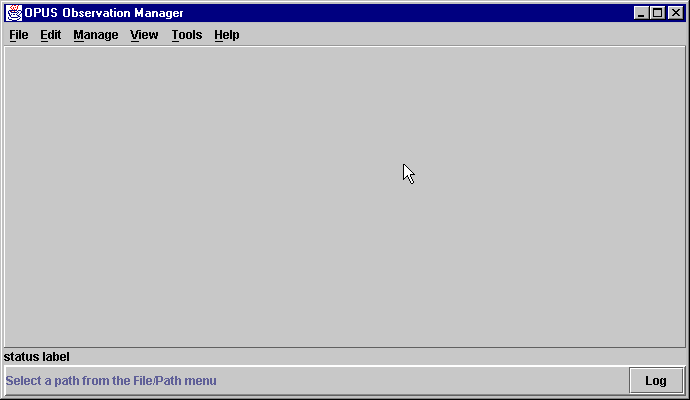
Note that nothing is displayed. This is because no path has yet been selected. Notice the message at the bottom of the screen.
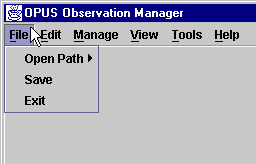
How do I select a path?
Move the cursor over the "Open Path" option and you will see the list of paths which are available to you.
Note that if the Managers do not find any path files in your OPUS_DEFINITIONS_DIR, you will be unable to do any processing.
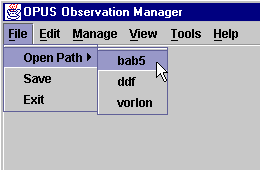
Select one (say bab5 in this case), and the Observation Status Files on that blackboard will be displayed.
Ugly! How can I get rid of the dots?
How can I subdivide a display field?
dataset=name,10,begin_time,14
start_time=year,4,day,6,time,9
How do I save my preferences?
<username>OMG.ini
| Platform | user.home |
| Windows 2000 | C:\Documents and Settings\<username>\OPUSDATA |
| Windows NT | C:\Winnt\Profiles\<username>\OPUSDATA |
| Windows 98 | C:\Windows\OPUSDATA |
| Unix | ~/OPUSDATA |
Does the OMG support the OAPI?
What is an Observation Status File (OSF)?
The OMG is sent data by the servers of the same type as are present in OSFs for each "observation" in the pipeline. These data are used to control and manipulate observations which are being processed by the OPUS pipeline, and to some extent can be modified by the user through the OMG.
The following information is contained in an OSF (the sizes of certain fields may be different in your pipelines):
34070859-cccccc__________________.gif9703_________________________________________________________-GIF-000-____
|-- 1 -| |--------- 2 ----------| |---------------------------------- 3 -------------------------| |4| |5| | 6|
- TIME STAMP: The first component of the OSF is a time stamp expressed as a hexadecimal number (34070859). This is the time at which the observation first started in the pipeline. It is translated into a user-friendly ASCII time and displayed in the "time_stamp" field of the OMG display. You can use the time_stamp utility to make the same translation.
-
STATUS: These letters indicate the status of the observation (cccccc,
i.e., the first six steps in the pipeline are "complete"). Typically, one
column is used for one process in the pipeline, although multiple processes
can share a column. The order of the columns is defined in the
pipeline.stage
file, which also controls the two character mnemonics (OSF stage) used
in the OMG title bar and the meanings associated
with each status. Each process will set status fields for the observation
based on whether the processing was successful or not. The standard is:
- "w": waiting for the process,
- "p": processing data,
- "c": successful completion,
- "e": unsuccessful completion,
- "n": not applicable,
- "x": process died.
- DATASET: This field contains the name of the observation or dataset (gif9703). The OMG displays this in the "OBS" column. The default size of this field is 64 characters (changed from 23 in release 2.2), so this is the default maximum size of a dataset name.
- DATA ID: This field is called the datatype of the observation or dataset (GIF in this example). It is often used by processes to determine what kind of observation is coming down the pipeline, and whether that kind of observation is to be processed. The OMG displays this field in the "data_id" (class) column. The default size of this field is 3 characters.
- DCF NUMBER: This field contains an optional identifier of the observation (000). Called the Data Classification Field (DCF). The OMG allows the user to sort the display using this field. Consequently if there are meaningful attributes which can be used to classify the datasets, they can be set in this field. For example, one might use this field to specify the source of the dataset. The default size of this field is 3 characters. It is displayed in the "dcf_num" column of the OMG.
- COMMAND: This portion of the OSF is the command area (all underscores, or blank, in this example). This field provides the capability to SUSPend an observation. As an example, if it is known that a particular reference file is required by a calibration step for this one observation, this observation can be SUSPended in the pipeline before reaching calibration without affecting the processing of other observations. The OMG provides the capability both to SUSPend an observation and to RESUme it. The command is displayed in the "obs_cmd" column of the OMG.
Can I modify how an Observation Status File is structured?
You can configure the sizes, locations, and formatting of the fields in an OSF for your pipelines by changing the default parameters in the file opus.env located in OPUS_OBSERVATIONS_DIR. The portion of this file related to OSF's looks like:
!
! OSF definitions
!
! The size of each OSF field must be specified here as must a template for
! composing a string representation of the OSF out of each field. The OSF
! fields that distinguish one OSF from another also must be specified.
!
! The formatting and keyword names are self-explanatory although it should
! be noted that each field must appear in the template once and only once,
! there must be at least one field labeled as "UNIQUE", and the template
! format and field sizes should be consistent with the blackboard
! implementation to be utilized (ie., appropriate for file names if BB_TYPE =
! FILE).
!
OSF.TEMPLATE_DELIMS = {}
OSF.TEMPLATE        = {TIME_STAMP}-{OBS_STAT}.{DATASET}-{DATA_ID}-{DCF_NUM}-{OBS_CMD}
OSF.UNIQUE1         = DATASET
OSF.UNIQUE2         = DATA_ID
TIME_STAMP.SIZE     = 8
OBS_STAT.SIZE       = 24
!DATASET.SIZE        = 23       VMS only
DATASET.SIZE        = 64
DATA_ID.SIZE        = 3
DCF_NUM.SIZE        = 3
OBS_CMD.SIZE        = 4
The comments above include the instructions for changing these parameters.
The fields marked as "UNIQUE" are those used by the OPUS system to distinguish
one OSF from another. This is important because duplicate OSF's are not
allowed on the blackboard. It is not recommended that you change the unique
fields although you are free to do so.
Before changing any of these parameters for a pipeline, be sure that
there are no OSF's in your paths,
otherwise they will not be recognized as OSF's after you make the changes.
In addition you should make sure that the OPUS CORBA servers are not running.
How do I create an OSF?
% osf_create
   A path file must be specified (-p)
   Usage:
            osf_create -p pathfilename -f filename -t type
                    -n number -c column -s status

   Example:
            osf_create -p blue.path -f n32s1496
                    -t nic -n 123 -c DP -s p

   note: the path file must be in OPUS_DEFINITIONS_DIR
Note that the -c flag will default to the first column and multiple statuses can be specified:
          osf_create -p blue.path -f n32s1496
                   -t nic -n 123 -s ccw
How do I update an OSF?
A path file must be specified (-p)
Usage:
OSF_update -p
pathfilename -f filename [-t type]
[-n number] [-m new_dcf] [-c column] -s status
Example:
OSF_update -p
blue.path -f n32s1496
-t nic -n 123 -c DP -s p
note: the path file must be in OPUS_DEFINITIONS_DIR
Note that the -c flag will default to the first column in your PATH_pipeline.stage file, and multiple status values can be specified:
          OSF_update -p blue.path -f n32s1496
                   -t nic -n 123 -s ccw
This results in an update to an existing OSF on the OSF blackboard described in the OPUS_OBSERVATIONS_DIR entry of OPUS_DEFINITIONS_DIR:blue.path. The OSF blackboard is searched for an OSF matching the DATASET (n32s1496), DATATYPE (nic), and DCF (123) values. If found, the STATUS field of the OSF is modified such that the first column is set to 'c', the second column to 'c' and the third column to 'w'. All other OSF status columns are unaffected.
How do I test for an Observation Status File?
   % osf_test

   Usage:
            osf_test -p pathfilename [-f filename] [-t type] [-x timestamp]
                    [-n number] [-c column] [-s status] [-m command]
                   [-pr time status dataset dataid dcfnum command COLUMN]
   Example:
            osf_test -p blue.path -f n32s1496 -pr GC
    note: the path file must be in OPUS_DEFINITIONS_DIR
The utility provides a means of querying an OSF blackboard and printing information for selected OSFs. The entire OSF can be printed or only certain OSF fields can be printed, using the pr option and a fixed set of OSF keywords.
For example, to query the KW column of a particular dataset running in the sample pipeline, use
   % osf_test -p g2f.path -f gif9506 -pr KW

   c
To find the DATASET names for all OSFs that are in an error state in the KW stage, use
% osf_test -p g2f.path -c KW -s e -pr dataset
   gif9508x01
   gif9508x02
   gif9508x03
   gif9508x05
This tool is useful in scripts when actions to be performed depend on the state of processing.
How do I read the time stamp on an Observation Status File?
YYYY MM/DD HH:MM:SSand displayed in the "Start Time" column of the display. Outside of the OMG, you can use the utility time_stamp to interpret these numbers. For example:
%time_stamp 33DC9DC8produces the response:
date: 28-Jul-97 13:25:28
Can I monitor more than one pipeline or path at a time?
This is because the set of processing stages defined in the pipeline.stage files (usually) varies from path to path. However, you can monitor both pipelines simultaneously by running two copies of the OMG.
Can I stop a specific observation from processing further?
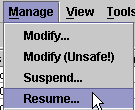
To do this, select the observation(s) with your mouse (this will highlight the selected line(s)) and then click on the "Suspend..." option under the "Manage" pull down menu.
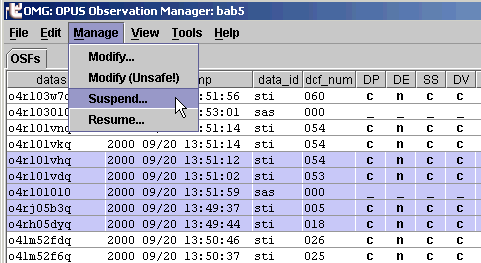
Selecting the "Suspend..." will bring up a confirmation dialog:

Choosing "OK" will update the corresponding OSFs with the string "halt" in the command section of the OSF.
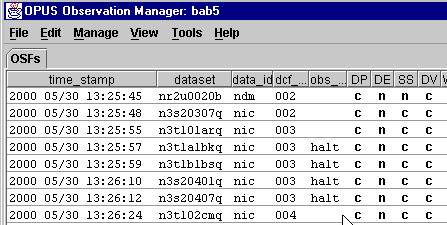
The "halt" command will alert the processes polling for observations to skip the selected observation. The observation(s) can then be resumed by highlighting the pertinent observations in the OMG display, selecting "Resume..." from the "Manage" menu, and choosing "OK" in the confirmation dialog.
Note that the Java managers do not actually modify the Observation Status Files directly. Instead a request is made of the CORBA server to do so.
While the Observation Status Files should accurately reflect the status
of the blackboard, it should be remembered that the actual files constitute
a backing store for the blackboard maintained by the server.
How do I tell if an observation has encountered a processing problem?
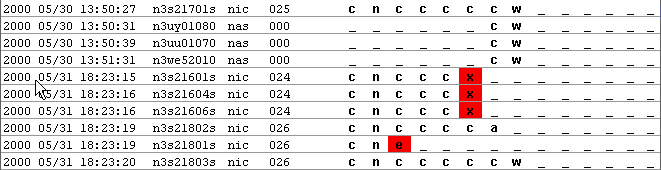
Additionally, there is a count of the observations in each stage at the bottom of the OSF window.
![]()
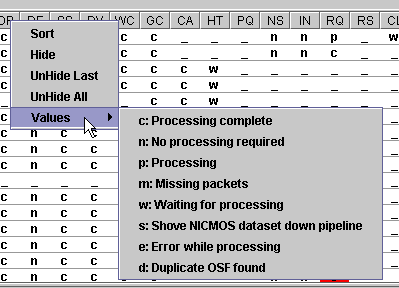
If you see columns containing "e" or "x", but the counters don't seem to be registering them, there might be a missing status value in the default list. That list is in the original OMG.ini which is in the .jar file, and has been preset to:
status_values=c,w,p,e,f,x,c,v
You might want to add status values to this list. To alter this list of values you need to save a similar line in your personal <username>OMG.ini file found in your preferences directory. Anything you have in your personal <username>OMG.ini file will override the original defaults. OMG.ini is similar to the PMG.ini, and contains some defaults for configuring the OPUS managers.
Additionally, you might get information about what caused the problem by
examining
the process log file for the stage that failed.
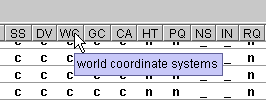
Is there a way to determine the meaning of a status of an observation?
When you "hover" over a particular status column header, the cryptic two letter mnemonic for that stage will be interpreted in a standard Java tooltip.
How do I change the status of one or more observations?
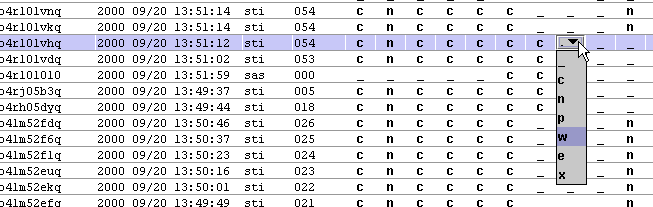
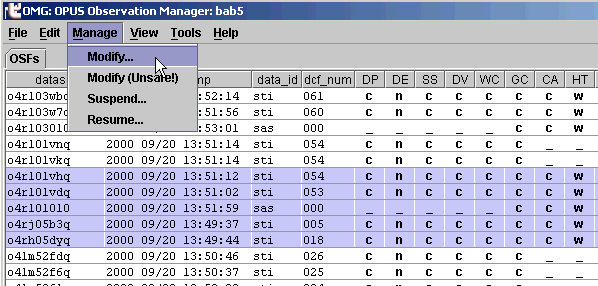
This results in a single window displaying the current status values of the first OSF selected. Any status modifications requested by using the dialog will be applied to all selected OSFs that have the same current status values as the first OSF selected.
This is considered safe because if you happen to pick up a few OSFs with your mouse selection that you did not intend to modify, they most likely will have different status entries than the first OSF selected and they will not be modified. A message will appear in the OMG log window indicating that the OSF was skipped if this happens.
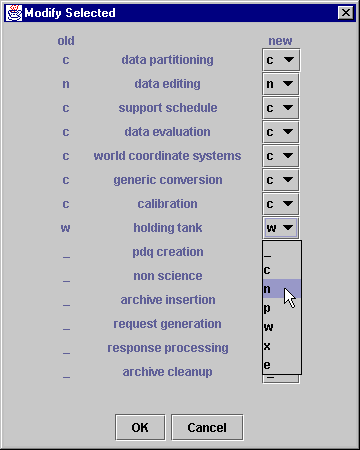
![]()
Click on the button next to the column heading that you wish to change. A list of available column values will be displayed-- simply click on the desired value. Follow this procedure to modify as many columns as desired. Once you are finished, click on the "OK" button located at the bottom of the modify window. This will send a request to the server to make the desired changes to the OSF(s) and then the window will disappear.
The list of available column values for each pipeline stage is determined
by entries in the pipeline.stage file. If you
want to modify a certain OSF column to a value that does not appear in
the menu of possible selections, then the pipeline.stage file needs to
be updated with this new value.
Can I change the frequency at which the display is updated?
The default FILE mode still polls the entire blackboard at regular intervals, but the server does the polling instead of each manager.
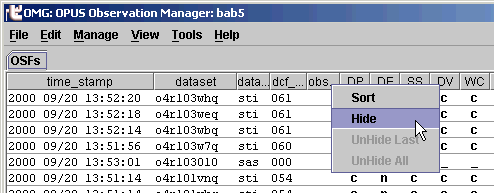
Can I filter the types of Observation Status Files that are displayed?

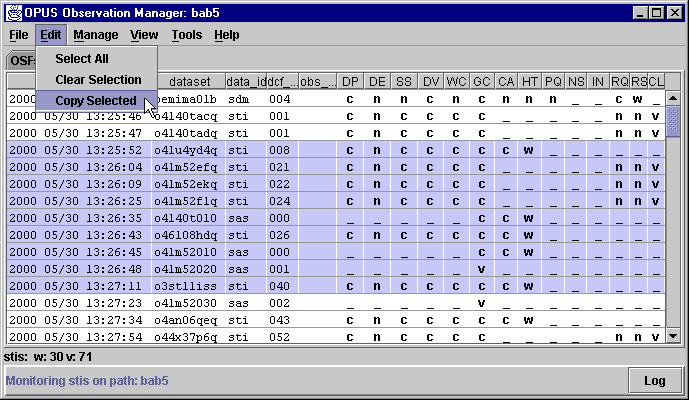
Can I copy part of the OSF listing to the system clipboard?
How do I change the colors used on the display?
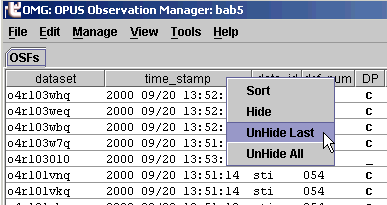
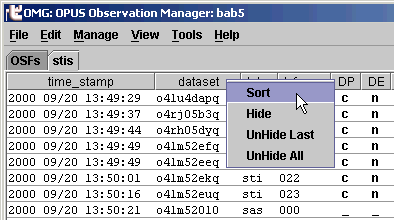
What controls the order of the observations in the OMG?
The same behavior, but without the menu, can be obtained with a "left click"
on the column title.
Is there any limit on the length of an observation "name"?
   gif9401b.dat
   gif9443d.dat
   gif9507.dat
   gif9502b.dat
   gif9525a2.dat
What is the pipeline stage file?
!
! g2f_pipeline.stage
!
! Pipeline stage files define the title, description, and status values
! for each stage of a data processing pipeline. The number of stages is
! defined by the required key NSTAGE.
!
! Each stage entry begins with the class STAGEnn where nn is a number between
! 01 and 99 (the number must be formatted as two digits) that indicates where
! a stage falls in the processing order (the first stage is 01, the second 02,
! and so on). Valid subclasses include:
!
! .TITLE        (required) a two character title for the stage
! .DESCRIPTION  (required) a short description for the stage
! .PROCESSnn    (optional; nn : 01 to 99) a process name for that stage
!
! (NOTE: all values containing spaces must be enclosed in single quotes)
!
! In addition, the characters that indicate the status of a dataset with
! respect to each stage are defined in this file. There are four subclasses
! to which a status character can be assigned to:
!
! .CSTATUS.c    status indicates "complete" in this stage
! .TSTATUS.c    status indicates "trouble" in this stage
! .PSTATUS.c    status indicates "pending" in this stage
! .NSTATUS.c    status does not fall into any category
!
! where c is the status character. The value for each of these entries
! should be a short description of its meaning. For example,
!
! STAGE01.CSTATUS.P = 'Processing dataset'
! STAGE01.TSTATUS.E = 'Fatal error while processing dataset'
! STAGE01.NSTATUS.W = 'Waiting for processing'
!
! Status characters must be categorized consistently across all stages; if
! a character is assigned as a CSTATUS for one stage, that same character
! cannot be assigned to TSTATUS, PSTATUS, or NSTATUS in another stage.
!
!------------------------------------------------------------------------
NSTAGE = 6
STAGE01.TITLE = IN
 STAGE01.DESCRIPTION = 'GIF INIT'
 STAGE01.CSTATUS.C = 'GIF file recognition complete'
 STAGE01.TSTATUS.X = 'External process controller error'
STAGE02.TITLE = KW
 STAGE02.DESCRIPTION = 'Database select'
 STAGE02.NSTATUS.W = 'Waiting for keyword lookup'
 STAGE02.PSTATUS.P = 'Keyword lookup in progress'
 STAGE02.CSTATUS.C = 'Keyword lookup complete'
 STAGE02.TSTATUS.E = 'Error during keyword lookup'
STAGE03.TITLE = HD
 STAGE03.DESCRIPTION = 'Hold up'
 STAGE03.NSTATUS.W = 'Waiting for hold up'
 STAGE03.PSTATUS.P = 'Delaying processing for a while'
 STAGE03.CSTATUS.C = 'Hold up complete'
 STAGE03.TSTATUS.E = 'Error occurred during hold up'
 STAGE03.TSTATUS.X = 'External process controller error'
STAGE04.TITLE = FT
 STAGE04.DESCRIPTION = 'GIF to FITS'
 STAGE04.NSTATUS.W = 'Waiting for conversion to FITS'
 STAGE04.PSTATUS.P = 'Conversion of GIF to FITS in progress'
 STAGE04.CSTATUS.C = 'Conversion to FITS file complete'
 STAGE04.TSTATUS.E = 'Error occurred during conversion'
STAGE05.TITLE = LH
 STAGE05.DESCRIPTION = 'List FITS Header'
 STAGE05.NSTATUS.W = 'Waiting for FITS header listing'
 STAGE05.PSTATUS.P = 'Generating FITS header listing'
 STAGE05.CSTATUS.C = 'FITS header listing complete'
 STAGE05.TSTATUS.E = 'Error occurred during FITS header listing'
 STAGE05.TSTATUS.X = 'External process controller error'
STAGE06.TITLE = CZ
 STAGE06.DESCRIPTION = 'File Compression'
 STAGE06.NSTATUS.W = 'Waiting for file compression'
 STAGE06.PSTATUS.P = 'Compressing FITS file'
 STAGE06.CSTATUS.C = 'FITS file successfully compressed'
 STAGE06.TSTATUS.E = 'Error occurred during file compression'
 STAGE06.TSTATUS.X = 'External process controller error'